Setting up usage tracking
Usage Tracking lets you charge customers accurately for how much they actually use a rental item — not just how long they had it. Your staff records the odometer, fuel level, or battery reading at pickup and again at return. Sharefox handles the maths and adds the correct extra charges to the order automatically.
Common examples:
• A car rented for 3 days with a 300 km package — customer drives 420 km — 120 km extra is charged at your set rate
• An electric vehicle rented for a weekend with 80 kWh included — customer returns with 65 kWh — 15 kWh extra is billed
• A machine rented with a fuel allowance — the fuel used above the included amount is added to the invoice
Usage Tracking must be enabled for your site before the steps below are available. If you do not see the Usage Tracking options described in this guide, contact Sharefox support or your onboarding contact to have the feature switched on.
Setup Overview
Setting up Usage Tracking has three stages. You only need to do this once per usage type:
- Define your usage metrics - Tell Sharefox which metrics you track and what unit to use — e.g. "Mileage" in km, or "Battery" in kWh.
- Create a usage add-on product (e.g. "Standard KM Package") that holds your included allowance and the price per extra unit.
- Attach the accessory to the cars or machines it applies to. Customers will then be able to select it during booking.
Step 1 — Define Your Usage Metrics
Usage metrics are the measurements you track. These are set up at site level and are shared across all your products.
1. In the Sharefox Admin, go to Settings → Usage Tracking.
2. Click Add Metric.
3. Fill in the fields:
Metric name: A clear label your staff will see, e.g. "Mileage", "Battery level", or "Fuel consumption".
Unit: The measurement unit: km, kWh, L (litres), etc
4. Click Save.

5. Repeat for each metric you need (e.g. one for km, one for kWh if you have both regular and electric vehicles).
| ✅ Tip: You can use the same metric for similar vehicles. One "Mileage (km)" metric can be used across all cars on your site — you do not need a separate metric per car model. |
Step 2 — Create a Usage Add-On Product
A usage add-on is a product that represents a usage package — for example "Standard KM Package" or "Premium KM Package". Each package specifies how much usage is included and what you charge per extra unit. In Sharefox add-on products are called accessories.
Creating the usage accessory
- Go to Products in the Sharefox Admin.
- Click Add product → Rentals
- Give the add-on a name that your customers will recognise, e.g. "Standard KM Package (300 km/day)".
- Set a price for the add-on itself if applicable (e.g. a "Premium Package free km" may have an upfront cost). Leave at 0 if there is no package fee.
- Activate the accessory checkbox to display the usage section as an add-on
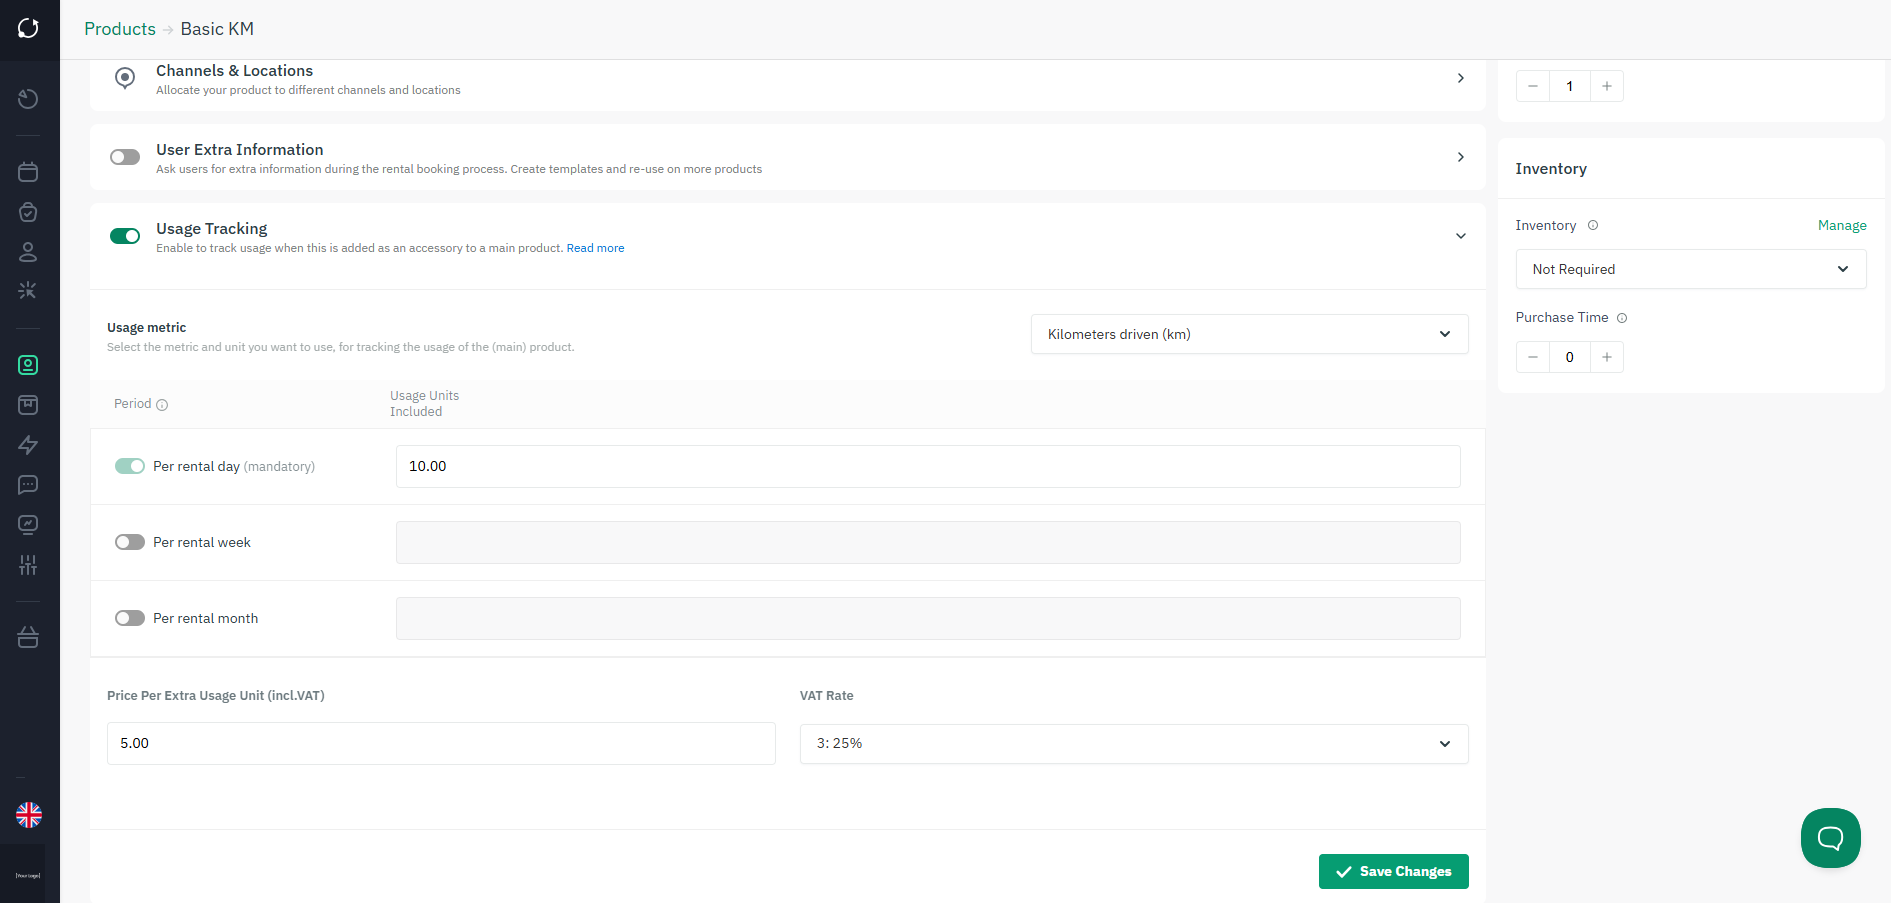
- Under More Options you now find the Usage Tracking section. Toggle Usage Tracking to On.
- Select the metric this add-on tracks (e.g. "Mileage").
- Fill in the usage parameters:
| Field | What it means |
| Included usage per day | How many units are included for each day of the rental. This is mandatory. E.g. 100 (for 100 km per day). |
| Included usage per week | Optional. If your pricing works on weekly periods, enter the weekly allowance instead of — or in addition to — the daily one. |
| Included usage per month | Optional. Same as above for monthly rentals. |
| Price per extra unit | What you charge per unit above the included amount (excl. VAT). E.g. 2.50 NOK per extra km. Can be 0 if there is no extra charge. |
8. Click Save.
| 💡 Note: Usage Tracking can only be enabled on rental accessories, not on main products or subscription add-ons. |
Tip! IF you want to enable a free km or simply track the units, place a high number on Usage Units Included and/or put 0 in the Price Per Extra Unit
Creating multiple packages (e.g. Standard and Premium)
If you offer tiered packages for the same metric — for example a 100 km/day standard package and a 200 km/day premium package — create a separate add-on product for each. You can then group them so that customers can only choose one at a time (see the next section).
Step 3 — Attach the Add-On to a Rental Product
Once your usage products exist, you need to link them to the rental products (e.g. specific car models) they apply to.
17. Open the rental product in the Sharefox Admin (e.g. your car model product).
18. Scroll to the Product options section and find Package and addons.
19. Click +Add product and select the usage add-on you created (e.g. "Standard KM Package").
20. Repeat for any additional packages (e.g. "Premium KM Package").
21. Click Save.

|
Rental product page — Add-ons section showing Standard KM Package and Premium KM Package attached |
| 💡 Note: You can attach the same add-on product to multiple rental products. For example, if all cars on your site use the same KM packages, you only need to create the packages once and attach them to each car. |
Tracking multiple metrics on the same rental item
You can attach add-ons for different metrics to the same rental product simultaneously. For example, a car can have both a KM package (tracking mileage) and Fuel (tracking litres) active on the same order. Each metric is tracked independently, and each generates its own extra charge line if the allowance is exceeded.
| ✅ Tip: Create one add-on product per metric. Attach as many as you need to the same rental product — there is no limit on the number of different metrics per item. |
Making packages mutually exclusive (radio button groups)
If you have two or more packages for the same metric and you want customers to pick only one, you can group them with the "One option required" setting.
- Open the main rental product the add-ons are attached to (e.g. the car model).
- Find the add-on group for those packages.
- Check the box One option required.
With this setting on, selecting one package automatically deselects the others — just like radio buttons. The customer must choose exactly one option from the group.

|
Rental product page — add-on group with 'One option required' checkbox checked; both Standard and Premium KM packages listed in the group |
| ✅ Tip: Give the group a clear name, like "KM Package" or "Mileage Package". This is what customers see as the group label on the booking page. |
What Customers See on the Booking Page
When a customer books a car with usage add-ons attached, they will see the packages listed on the product page. The display changes depending on whether they have selected their rental dates yet:
• Before dates are selected: The customer sees the package name (e.g. "Standard KM Package").
• After dates are selected: The customer also sees the total included usage for their rental period (e.g. "300 km included" for a 3-day rental at 100 km/day) and the price per extra unit (e.g. "2.50 NOK/km extra").
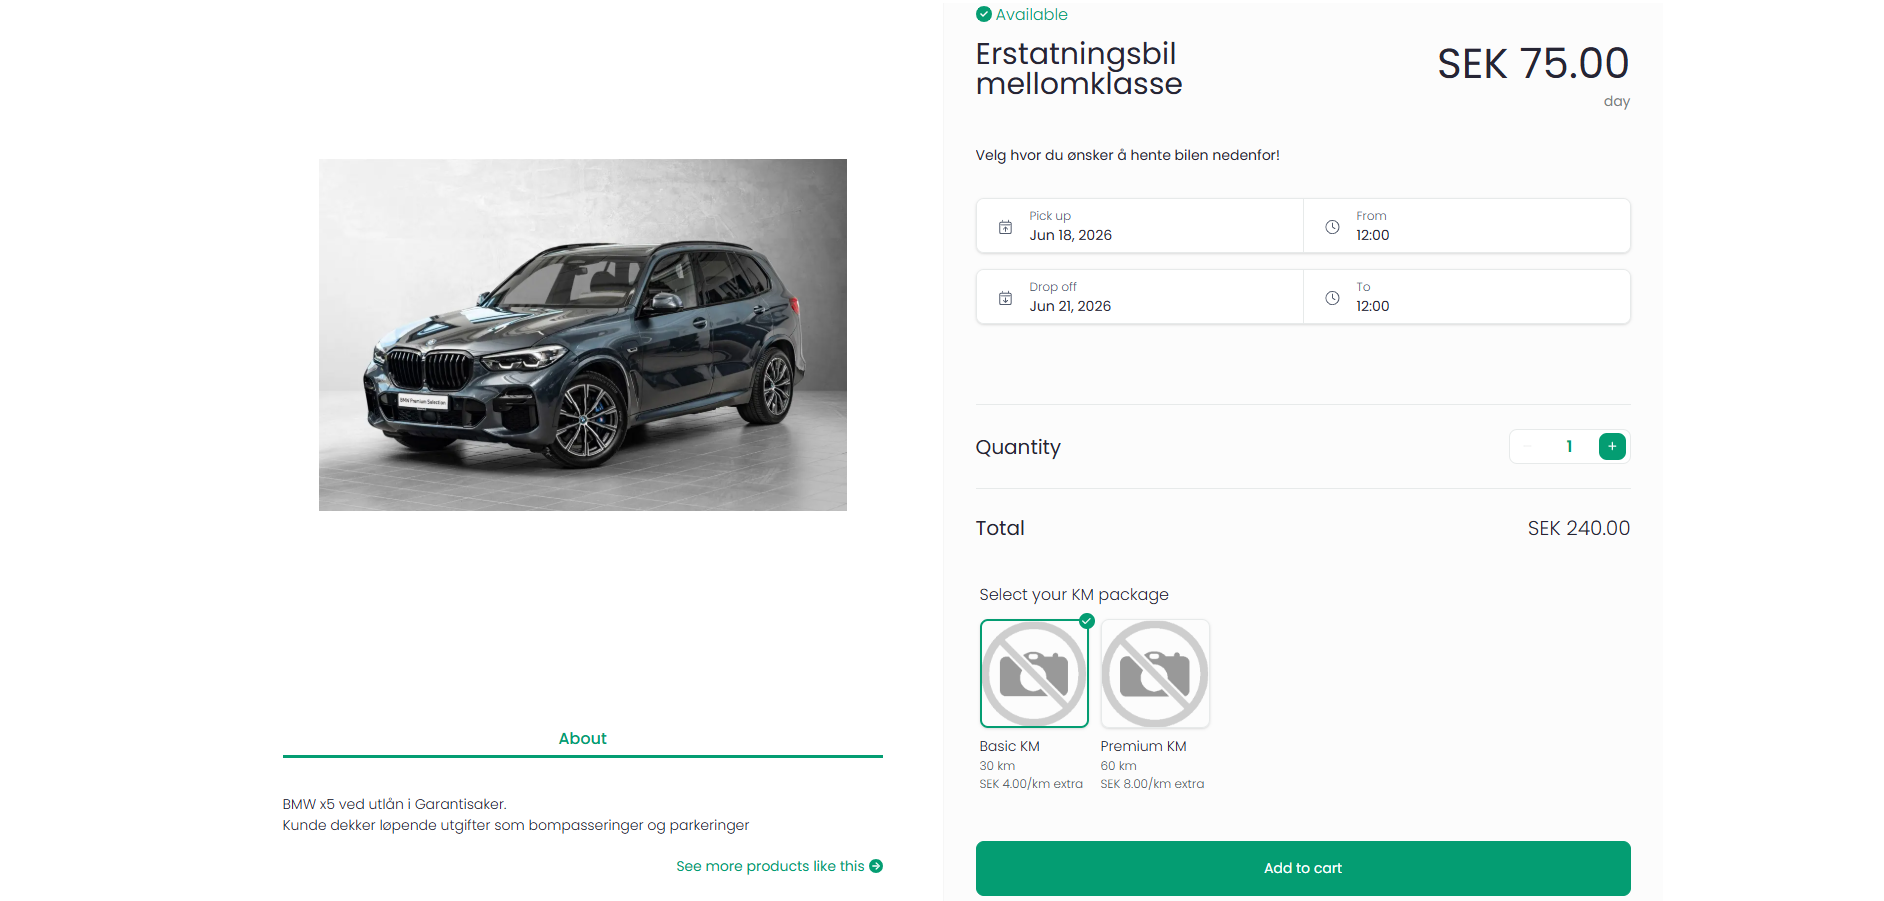
|
Customer storefront — product page showing KM package options with dates selected; included km and extra rate visible per package |
This gives customers the information they need to choose the right package before they confirm their booking.
| ✅ Tip: If you want a package to be pre-selected by default, use the Default selection setting on the add-on. This is useful if most customers should take the standard package without having to actively choose it. |
Creating Orders with Usage Add-Ons from the Admin
Managers can also create orders directly from the Admin (rather than through the customer-facing shop). In this case, usage add-ons can be added manually during order creation.
Unlike the shop, the mandatory selection rule does not apply when creating orders from Admin — you can create an order without a usage package if needed.

|
Admin order creation — add-on selection panel with a usage add-on (KM Package) being added manually |
Setup Checklist
Use this checklist to confirm everything is in place before your first tracked rental:
| ☐ | Usage Tracking is enabled for your site (contact support if not) |
| ☐ | Usage metrics defined (e.g. Mileage in km, Battery in kWh) |
| ☐ | Add-on products created with included units and extra unit price |
| ☐ | Add-ons attached to the relevant rental products |
| ☐ | Package groups set to "One option required" if you offer multiple tiers |
| ☐ | Test booking completed to confirm packages appear correctly on the shop |
Next: Once setup is complete, see the companion guide Usage on Orders (Pickup & Return) to learn how to record values during a rental.